CMS Migration Timeline: How Long Each Stage Actually Takes
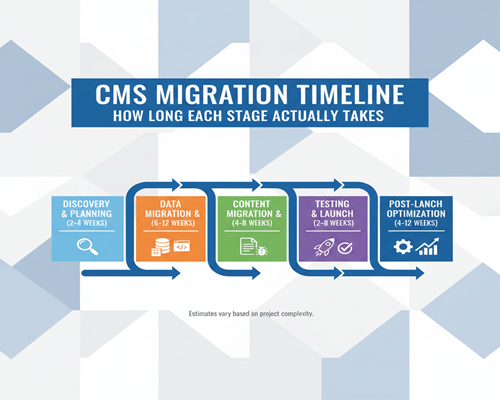
“How long will this CMS migration take?” It’s the first question every stakeholder asks, and unfortunately, it’s one of the hardest to answer with precision. While project managers might optimistically quote 8-12 weeks, the reality often stretches far beyond initial estimates—not because of poor planning, but because CMS migration is inherently complex and full of variables that only reveal themselves once you’re deep into the process.
Understanding the realistic timeline for each stage of a CMS migration isn’t just about setting expectations; it’s about protecting your business from extended downtime, budget overruns, and the frustration that comes from missed deadlines. A rushed migration can result in broken links, lost content, poor SEO performance, and a diminished user experience. On the other hand, an overly cautious timeline can mean missed market opportunities and prolonged maintenance of two systems simultaneously.
The truth is that migration timelines vary dramatically based on factors like your website’s size, content complexity, technical requirements, team resources, and whether you’re migrating from a legacy system or a modern platform. A small business blog might transition smoothly in six weeks, while an enterprise e-commerce site with thousands of product pages could easily take six months or more.
In this comprehensive guide, we’ll break down each stage of the CMS migration process with realistic timeframes based on real-world projects. You’ll learn what actually happens during each phase, what factors can accelerate or delay your timeline, and how to build a migration schedule that’s both ambitious and achievable. Whether you’re planning your first migration or looking to improve upon past experiences, understanding these timelines will help you navigate one of the most critical projects your digital team will undertake.
Pre-Migration Planning Phase
The pre-migration planning phase is where many organizations make their first critical mistake: rushing through it to get to the “real work” of migration. In reality, this phase is the foundation upon which your entire project rests. Spending an extra week in planning can save you months of rework later.
Initial Audit and Assessment (Week 1-2)
Your first task is conducting a comprehensive audit of your existing CMS. This means creating a complete content inventory—every page, post, image, PDF, and embedded media file. For a website with 500 pages, this audit alone can take a full week if done manually. You’ll need to document not just what content exists, but its structure, metadata, taxonomy, user permissions, and interdependencies.
Simultaneously, your technical team should be reviewing your current infrastructure. What custom functionality exists? Which third-party integrations are critical to your operations? What are your current hosting specifications, and will they translate to the new platform? This technical review often uncovers forgotten customizations that will need to be rebuilt or replaced.
Stakeholder requirements gathering is equally crucial during this period. Meet with content creators, marketers, developers, and executives to understand their pain points with the current system and their expectations for the new one. These conversations will shape your entire migration strategy and help you prioritize features that matter most to your organization.
Choosing the Right Platform and Team (Week 2-3)
Once you understand your current state and future requirements, you can make informed decisions about your target platform. This is also when many businesses face a critical decision: should they handle the migration in-house or partner with a CMS migration agency? Organizations with limited technical resources, tight deadlines, or complex requirements often find that working with specialists can actually accelerate their timeline while reducing risk. Agencies bring proven methodologies, migration tools, and experience navigating common pitfalls that can derail first-time migrations.
The choice between in-house and agency support isn’t just about capability—it’s about capacity. Your internal team may be perfectly capable of executing a migration, but do they have the bandwidth while maintaining day-to-day operations? An experienced agency can often complete in weeks what might take an internal team months of part-time effort.
Resource Allocation and Planning (Week 2-3)
With your platform and team structure determined, you’ll need to allocate resources strategically. This includes assigning clear roles and responsibilities to team members, establishing decision-making authority, and ensuring everyone has the time and tools they need to contribute effectively. Understanding the full scope of investment—including time, personnel, tools, and potential business impact—helps you make informed decisions about your migration approach.
Creating Your Migration Strategy Document (Week 3-4)
The planning phase culminates in a comprehensive migration strategy document. This blueprint should outline your chosen platform, migration approach (big bang vs. phased), content migration methodology, timeline with milestones, team roles and responsibilities, and success metrics.
Your strategy should also include a detailed risk assessment. What could go wrong? Common risks include data loss, SEO ranking drops, broken integrations, and extended downtime. For each identified risk, document your mitigation strategy. This proactive approach prevents last-minute scrambling when issues inevitably arise.
By the end of this 2-4 week planning phase, you should have complete clarity on what you’re migrating, where you’re going, who’s responsible for what, and how success will be measured. Teams that compress this phase to save time almost always pay for it later with delays, scope creep, and migration failures. Invest the time upfront, and you’ll set yourself up for a smoother journey through the remaining phases.
Design and Development Phase
Once your planning is complete, you enter what many consider the most creative and technically demanding phase of the migration: design and development. This is where your new CMS begins to take shape, transforming from abstract planning documents into a functional platform. The timeline for this phase varies more than any other, depending heavily on whether you’re using out-of-the-box solutions or building custom functionality.
Theme/Template Selection or Custom Design (Week 1-2)
If you’re working with a platform like WordPress, Drupal, or similar CMS that offers pre-built themes, you might find a template that meets 80% of your needs with minimal customization. In these cases, theme selection and basic customization can be completed in one to two weeks. You’ll evaluate options based on design aesthetics, responsive behavior, performance benchmarks, and feature sets.
However, if your brand requires a custom design that reflects your unique identity and user experience requirements, this phase extends considerably. Custom design work—including wireframing, mockups, stakeholder reviews, and revisions—can easily take three to four weeks before a single line of code is written. Organizations with complex approval processes or multiple stakeholder groups should budget extra time for design iterations.
Development Environment Setup (Week 1)
While design work progresses, your development team will be setting up the staging environment where the actual migration will take place. This includes installing the new CMS, configuring server settings, establishing database connections, setting up version control systems, and creating backup protocols. A properly configured staging environment is essential—it allows you to test thoroughly without risking your live site.
This setup phase also includes installing base plugins or modules that will provide core functionality. Each addition needs to be evaluated for compatibility, performance impact, and security. Rushing through this stage by installing unnecessary plugins can create technical debt that haunts you long after migration.
Custom Functionality Development (Week 2-6)
Here’s where timelines can stretch significantly. If your old CMS had custom features—unique search functionality, specialized content types, custom user roles, or proprietary integrations—these need to be rebuilt for your new platform. Simple customizations might take a few days, while complex features can require weeks of development time.
For example, a custom product configurator that took months to build in your original CMS won’t magically transfer to the new one. Your development team will need to either rebuild it from scratch, find a plugin or module that approximates the functionality, or rethink the feature entirely. Each custom element needs analysis, development, and testing, which is why websites with extensive customization often see this phase extend to eight weeks or more.
Third-Party Integrations Planning and Implementation (Week 3-5)
Modern websites rarely exist in isolation. You’re likely integrating with CRM systems, email marketing platforms, payment gateways, analytics tools, social media feeds, and more. Each integration point needs to be mapped, tested, and verified in your new CMS.
Some integrations transfer smoothly—changing your Google Analytics tracking code is straightforward. Others require significant rework. If you’re moving from a platform with native Salesforce integration to one that requires custom API work, you’re looking at additional development time. Payment gateway integrations are particularly sensitive; they require thorough testing and often involve working with third-party support teams to verify proper configuration.
Mobile Responsiveness and Cross-Device Optimization (Throughout)
Modern CMS platforms generally include responsive design capabilities, but that doesn’t mean your site will automatically look great on every device. Your team needs to test and optimize the user experience across smartphones, tablets, and various desktop screen sizes. Navigation menus that work perfectly on desktop often need rethinking for mobile. Forms, images, and interactive elements all require device-specific attention.
This optimization work happens throughout the design and development phase, adding time to each component as it’s built. Factor in at least one full week dedicated specifically to responsive refinement and testing.
Factors That Extend This Phase
Several common scenarios can push your design and development timeline beyond the eight-week mark. E-commerce functionality is notably time-intensive—product catalogs, shopping carts, checkout processes, and payment systems all require meticulous development and testing. Multilingual sites add complexity through translation management and locale-specific functionality. Membership sites with gated content, user dashboards, and complex permission structures demand extra development attention.
By the end of this phase, you should have a fully functional version of your new CMS running in a staging environment, complete with your design, custom features, and integrations—ready for the critical work of content migration that comes next.
Content Migration Phase
The content migration phase is often underestimated in both complexity and time requirements. While it might seem like a simple matter of copying and pasting content from one system to another, the reality involves data mapping, format conversions, quality assurance, and often painful decisions about what to migrate, what to archive, and what to leave behind entirely.
Content Audit and Cleanup (Week 1)
Before migrating a single page, conduct a critical content audit. Not everything in your current CMS deserves a place in the new one. That blog post from 2012 with outdated information? The product page for a discontinued item? The “News” section that hasn’t been updated in three years? This is your opportunity for a fresh start.
Smart organizations use migration as a forcing function for content governance. Review each piece of content and categorize it: migrate as-is, migrate with updates, archive for reference, or delete permanently. This audit typically reveals that 20-30% of existing content can be eliminated, which not only reduces migration time but also improves your site’s overall quality and SEO performance.
This cleanup phase takes longer than most teams anticipate. For a site with 500 pages, expect a full week of review time with multiple team members involved in content decisions. Larger sites with thousands of pages may need two to three weeks just for the audit process.
Migration Method Selection: Manual vs. Automated (Week 1-2)
Your next critical decision is how you’ll actually move the content. Automated migration tools and scripts can transfer large volumes of content quickly, but they rarely handle everything perfectly. Images might not map correctly, formatting can break, custom fields may not translate, and complex page layouts often require manual intervention.
Manual migration gives you complete control and ensures quality, but it’s time-intensive. Migrating even a simple page manually—copying text, reformatting, adding images, setting metadata, and verifying links—takes 15-30 minutes per page. For 200 pages, that’s 50-100 hours of work.
Most successful migrations use a hybrid approach: automated tools for bulk content transfer, followed by manual review and cleanup. This typically breaks down to one to two weeks for running automated scripts and addressing immediate issues, then another one to three weeks for manual refinement of critical pages.
URL Mapping and Redirect Planning (Week 2)
One of the most critical—and most overlooked—aspects of content migration is URL structure planning. Your old URLs likely won’t match your new CMS’s URL patterns. Every single URL change represents a potential broken link and lost SEO value if not handled properly.
Create a comprehensive URL map that documents every old URL and its corresponding new URL. This spreadsheet becomes the foundation for your 301 redirect strategy, which preserves your search engine rankings and ensures external links to your site continue working. For a medium-sized website, creating this map and implementing redirects typically requires one full week.
The complexity increases exponentially if you’re restructuring your site architecture during migration. Moving content from /products/category/subcategory/item to /shop/item requires careful planning to ensure no traffic or SEO value is lost in the transition.
Media File Migration (Week 2-3)
Images, PDFs, videos, and downloadable files present their own migration challenges. These assets need to be transferred, organized in the new media library, and relinked within content. File naming conventions often change between systems, and image sizes may need adjustment to work with your new theme’s requirements.
Automated tools can transfer media files in bulk, but you’ll need to verify that file paths update correctly in your content. Broken image links are among the most common post-migration issues, and they’re often not discovered until after launch when users start complaining about missing visuals.
For sites with extensive media libraries—think thousands of images or large video files—this process can take two full weeks or more. You’ll also need to consider whether to maintain your existing file structure or reorganize during migration for better long-term management.
Metadata and SEO Elements Transfer (Week 3-4)
Content isn’t just the text users see on the page. Every piece of content carries metadata: page titles, meta descriptions, Open Graph tags for social sharing, schema markup, alt text for images, and more. All of this SEO-critical information needs to transfer to your new CMS.
Some platforms handle metadata differently than others. What was a simple custom field in your old CMS might require a plugin or custom code in the new one. Ensuring this data migrates accurately is essential for maintaining search engine rankings and social media visibility.
Expect to spend at least one week specifically focused on SEO element verification, checking that titles, descriptions, and structured data are properly configured for every important page.
Quality Assurance Checkpoints (Throughout)
Throughout the content migration phase, build in regular QA checkpoints. Don’t wait until all 1,000 pages are migrated to start checking quality. Instead, migrate in batches—perhaps 50-100 pages at a time—then review before proceeding. This iterative approach catches systematic issues early, when they’re easier to fix.
The content migration phase is where patience pays dividends. Rushing through content transfer to meet arbitrary deadlines almost guarantees post-launch problems: broken links, missing images, formatting inconsistencies, and SEO damage. Build adequate time into your schedule, and recognize that content volume directly impacts duration—there’s simply no way to migrate 2,000 pages as quickly as 200.
Testing and Quality Assurance Phase
If there’s one phase where cutting corners comes back to haunt you, it’s testing and quality assurance. This is your last opportunity to catch issues before real users encounter them on your live site. A thorough QA process might feel tedious and time-consuming, but the cost of launching with broken functionality, security vulnerabilities, or poor performance far exceeds the investment in proper testing.
Functional Testing (Week 1)
Functional testing ensures every feature on your new site works as intended. This means systematically testing forms to verify submissions process correctly, checking that search functionality returns accurate results, confirming user registration and login processes work smoothly, and validating that all interactive elements respond appropriately.
Create a comprehensive testing checklist that covers every functional element of your site. For each feature, document the expected behavior and test multiple scenarios, including edge cases. Does your contact form handle special characters in email addresses? What happens if someone submits a form field that’s too long? Does your search function gracefully handle queries with no results?
For complex sites with user accounts, shopping carts, or membership areas, functional testing becomes more involved. You’ll need to test different user roles and permission levels, verify that payment processing works correctly, and ensure that protected content remains secure. E-commerce sites require particularly rigorous testing of the entire purchase flow, from product selection through checkout to order confirmation.
Cross-Browser and Device Testing (Week 1-2)
Your site might look perfect in Chrome on your development machine, but how does it perform in Safari on an iPhone 12? What about Firefox on a Windows laptop, or Samsung Internet on an Android tablet? Cross-browser compatibility issues remain surprisingly common, even with modern web standards.
Dedicate time to testing your site across multiple browsers (Chrome, Firefox, Safari, Edge), operating systems (Windows, macOS, iOS, Android), and device types (smartphones, tablets, desktops). Pay particular attention to older browser versions that your analytics show still represent a meaningful portion of your traffic.
Responsive design testing goes beyond simply resizing your browser window. Different devices have different capabilities, touch targets need appropriate sizing for mobile users, and navigation patterns that work on desktop often need rethinking for smaller screens. Plan for at least three to five days of thorough cross-device testing and refinement.
Performance and Load Testing (Week 2)
A beautifully designed site that takes eight seconds to load will drive users away before they see any of your content. Performance testing evaluates page load speeds, server response times, and how your site handles traffic spikes.
Use tools like Google PageSpeed Insights, GTmetrix, or WebPageTest to benchmark your site’s performance. Test not just your homepage, but various page types: content pages, product listings, search results, and media-heavy pages. Each page type has different performance characteristics and optimization needs.
Load testing simulates multiple users accessing your site simultaneously to ensure your hosting infrastructure can handle expected traffic. If you’re migrating a high-traffic site, you need confidence that your new platform won’t crash during peak periods. This testing often reveals database query inefficiencies, caching configuration issues, or server resource limitations that need addressing before launch.
SEO Validation (Week 2)
Your migration could undo years of SEO work if not handled carefully. SEO validation ensures you’re not inadvertently damaging your search engine visibility. Verify that all 301 redirects are functioning correctly, confirm that XML sitemaps generate properly and include all important pages, check that robots.txt files are configured appropriately, and ensure meta titles and descriptions transfer accurately.
Crawl your staging site with tools like Screaming Frog to identify broken links, missing alt text, duplicate content issues, or orphaned pages. Review your URL structure to confirm it’s logical and SEO-friendly. Test that structured data markup (schema.org) implements correctly for rich search results.
This SEO review typically takes two to three days for medium-sized sites, longer for large sites with complex architectures. The time investment protects the organic search traffic that may represent a significant portion of your site visits and revenue.
User Acceptance Testing (Week 2-3)
User acceptance testing brings real users—your content editors, marketing team, customer service representatives—into the testing process. These stakeholders use the site as they would in their daily work, providing feedback on usability, identifying workflow issues, and catching problems that technical testers might miss.
UAT often reveals important insights. Your content team might discover that the new editing interface is confusing, or that a feature they rely on daily works differently than expected. Addressing these concerns before launch prevents frustration and resistance to the new platform.
Schedule at least one week for UAT, including time to address the feedback and issues that emerge. For organizations with extensive content teams or complex workflows, two weeks of user testing provides better coverage.
Bug Fixing Iterations (Throughout)
Testing inevitably uncovers issues requiring fixes. Build time into your schedule for bug resolution and regression testing—fixing one issue sometimes creates new problems elsewhere. Prioritize bugs by severity: critical issues that break core functionality need immediate attention, while minor cosmetic inconsistencies can be addressed post-launch if necessary.
Most migrations go through two to three rounds of testing and bug fixes before reaching a launch-ready state. This iterative process is why the QA phase requires a full two to three weeks, not just a few days of quick checks.
Security Testing (Week 3)
Finally, conduct security testing to identify vulnerabilities before malicious actors do. Ensure SSL certificates are properly configured, verify that user data is encrypted during transmission and storage, test that file upload features don’t allow dangerous file types, and confirm that SQL injection and cross-site scripting protections are in place.
For sites handling sensitive information—customer data, payment information, personal health records—consider engaging a professional security audit. The cost of a breach far exceeds the investment in thorough security testing.
By the end of this phase, you should have confidence that your new CMS is stable, functional, secure, and ready for real-world use. The thoroughness of your testing directly correlates with the smoothness of your launch and the satisfaction of your users.
Launch and Post-Migration Phase
Launch day represents both an ending and a beginning. After weeks or months of planning, development, and testing, your new CMS finally goes live. But the work doesn’t end when you flip the switch—the immediate post-launch period is critical for ensuring your migration succeeds in the real world, not just in your staging environment.
Final Pre-Launch Checklist (Days 1-2)
The 24-48 hours before launch require methodical preparation. Create a detailed pre-launch checklist and work through it systematically. Perform a final backup of your old site—this is your safety net if something goes catastrophically wrong. Verify that all 301 redirects are in place and functioning correctly. Double-check DNS settings and ensure your team knows exactly when and how the switch will occur.
Notify key stakeholders about the launch timeline, including any expected downtime. If you’re launching during business hours, ensure your customer service team is prepared for potential questions or issues. Many organizations choose to launch during off-peak hours or weekends to minimize disruption, though this means your technical team needs to be available during non-standard hours.
Review your rollback plan one final time. If something goes wrong during launch, how quickly can you revert to the old site? Having a clear rollback procedure provides peace of mind and protects your business from extended outages.
DNS Changes and Go-Live (Day 3)
The actual launch process varies depending on your hosting setup, but typically involves updating DNS records to point your domain to the new server. DNS propagation can take anywhere from a few minutes to 48 hours, during which some users might see the old site while others see the new one. This transition period requires monitoring to ensure the changeover completes smoothly.
For large enterprise sites, launch strategies might involve more sophisticated approaches like gradual traffic shifting, where a small percentage of users are directed to the new site initially, with the percentage increasing as confidence grows. This phased approach reduces risk but extends the launch timeline.
During the actual go-live process, your technical team should be actively monitoring server performance, error logs, and user traffic patterns. Issues that never appeared in testing sometimes emerge under real-world traffic conditions, and rapid response can prevent small problems from becoming major incidents.
Immediate Post-Launch Monitoring (Days 3-7)
The first 72 hours after launch are critical. This is when you’ll discover whether your testing was thorough enough and whether your new CMS can handle real-world conditions. Monitor your site continuously during this period, watching for error spikes, performance degradation, broken functionality, or user complaints.
Set up alerts for critical metrics: server uptime, page load times, form submission failures, and checkout process completion rates for e-commerce sites. Review server logs daily to identify patterns of errors or unusual activity. Check your analytics to ensure tracking is working correctly—discovering two weeks after launch that you’ve been missing analytics data is a painful experience.
Pay attention to user feedback during this period. Monitor customer service channels, social media mentions, and contact form submissions for reports of issues. Users often discover problems that slipped through testing, particularly edge cases or workflows specific to their needs.
Search Engine Re-Indexing (Week 1-2)
Even with perfect 301 redirects, search engines need time to discover and index your new URLs. Submit your updated XML sitemap to Google Search Console and Bing Webmaster Tools immediately after launch. This signals search engines to recrawl your site and update their indexes.
Monitor your search console for crawl errors, which indicate broken links or redirect chains that need fixing. Some fluctuation in search rankings is normal during the re-indexing period—don’t panic if you see temporary drops in the first week. However, significant or sustained ranking losses suggest redirect issues or SEO problems that need immediate attention.
Track your organic search traffic closely during the first two weeks. Compare it to historical data to identify unusual patterns. A well-executed migration should see minimal long-term impact on organic traffic, though short-term fluctuations are common.
Performance Monitoring and Optimization (Week 1-2)
Real user traffic often reveals performance bottlenecks that didn’t appear during testing. A page that loaded quickly with simulated traffic might struggle when hundreds of actual users access it simultaneously. Monitor page load times, server response rates, and resource utilization during this period.
If performance issues emerge, prioritize them based on impact. A slow-loading homepage affects every visitor, while a performance issue on a rarely accessed page can wait for a less urgent fix. Common post-launch optimizations include adjusting caching configurations, optimizing database queries, or implementing a content delivery network (CDN) for better global performance.
User Feedback Collection (Week 2)
Beyond monitoring for technical issues, actively solicit user feedback. Send surveys to regular site visitors asking about their experience with the new design and functionality. Reach out to your content team for feedback on the editing experience. This qualitative feedback often highlights usability issues that metrics alone won’t reveal.
Be prepared to make iterative improvements based on this feedback. No migration is perfect on launch day, and the most successful projects view launch as the beginning of continuous improvement rather than the end of the project.
Decommissioning the Old System (Week 2 and Beyond)
Don’t immediately delete your old CMS after a successful launch. Keep it accessible (though not public-facing) for at least two to four weeks as a reference and safety net. You may need to reference the old system to verify content accuracy, retrieve archived information, or troubleshoot post-migration issues.
Once you’re confident the migration is stable and successful, you can begin the decommissioning process. Archive any content or data that didn’t migrate, document lessons learned for future reference, and finally shut down the old system. This final step brings closure to the migration journey.
The post-launch phase requires vigilance and responsiveness, but it’s also when you start experiencing the benefits of your new CMS—improved editing workflows, better performance, enhanced functionality, and a fresh foundation for your digital presence moving forward.
Realistic Total Timeline Breakdown
Understanding individual phase timelines is valuable, but what matters most to stakeholders is the total project duration from kickoff to launch. The reality is that CMS migration timelines vary dramatically based on site complexity, organizational resources, and project scope. Here’s what you can realistically expect based on different website sizes and complexities.
Small Website Migration (Under 100 pages): 8-12 weeks
For small business websites, personal blogs, or simple organizational sites with fewer than 100 pages, migrations are relatively straightforward. These projects typically involve minimal custom functionality, limited integrations, and straightforward content structures.
The timeline breaks down as: two weeks for planning and platform selection, three to four weeks for design and development (often using pre-built themes with minor customization), two weeks for content migration and testing, and one week for launch and initial monitoring. Small sites benefit from simpler decision-making processes and fewer stakeholders, which accelerates approval cycles.
However, even small sites can exceed this timeline if they have complex custom features, extensive third-party integrations, or particularly demanding design requirements. A 50-page site with custom e-commerce functionality will take considerably longer than a 200-page informational site with standard features.
Medium Website Migration (100-500 pages): 12-20 weeks
Medium-sized websites represent the most common migration scenario for established businesses. These sites typically include multiple content types, some custom functionality, various third-party integrations, and enough content volume to require systematic migration processes.
Expect three to four weeks for thorough planning and requirements gathering, five to six weeks for design and development including custom feature builds, four to five weeks for content migration with quality assurance, two to three weeks for comprehensive testing, and one to two weeks for launch and stabilization. The extended timeline accounts for more complex stakeholder coordination, more extensive testing requirements, and the need for custom development work.
Organizations at this scale often face resource constraints—internal teams juggling migration work alongside regular responsibilities. This divided attention can push timelines toward the longer end of the range. Clear project management and dedicated resources help keep medium migrations on track.
Large Enterprise Website (500+ pages): 20-32+ weeks
Enterprise-level migrations are substantial undertakings that often stretch six months or longer. These projects involve thousands of pages, complex information architectures, sophisticated functionality, multiple user roles and permissions, extensive integrations with enterprise systems, and rigorous compliance requirements.
The planning phase alone can take four to six weeks as teams document existing systems, gather requirements from numerous stakeholders, and develop comprehensive migration strategies. Design and development might require eight to ten weeks, especially when rebuilding custom applications or integrating with CRM, ERP, or other enterprise systems. Content migration for thousands of pages, even with automated tools, can take six to eight weeks when you factor in quality assurance and metadata verification.
Testing requires three to four weeks minimum, covering functional testing, security audits, accessibility compliance, performance testing under high load, and extensive user acceptance testing across multiple departments. The launch and stabilization period extends to two weeks or more as teams monitor enterprise-scale traffic and address issues affecting large user bases.
Enterprise migrations frequently encounter additional complexities: longer approval chains, compliance reviews, security audits, and coordination across multiple teams or even multiple geographic locations. These organizational factors can extend timelines beyond the technical work itself.
E-Commerce Complexity Multiplier
E-commerce functionality adds significant time to any migration, regardless of site size. Product catalogs need migration with all attributes, variations, and inventory data. Shopping cart and checkout processes require extensive testing. Payment gateway integrations demand careful configuration and security verification. Customer account data must transfer securely with proper encryption.
Add at least 25-50% to your baseline timeline for e-commerce migrations. A medium-sized site that might normally take 12-16 weeks could easily extend to 18-24 weeks when e-commerce functionality is involved.
Multilingual Site Considerations
Websites serving multiple languages and regions introduce their own timeline challenges. Content exists in multiple versions that all need migration. Translation management systems require integration and configuration. Each language version needs testing to ensure proper character encoding, right-to-left text support where applicable, and locale-specific functionality.
Multilingual migrations typically add 30-40% to project timelines. A site available in five languages essentially means migrating five versions of your content, even though some efficiencies exist through shared templates and functionality.
Phased vs. Big Bang Approaches
Your migration strategy fundamentally impacts timeline. A “big bang” migration—moving everything at once—concentrates the work into a single intensive project with a defined endpoint. A phased approach—migrating sections of your site incrementally—extends the overall timeline but reduces risk and allows for learning between phases.
Phased migrations might take 30-50% longer in total elapsed time, but they often make better use of limited resources and allow teams to refine their processes between phases. The first phase might reveal issues or inefficiencies that you can address before tackling subsequent phases.
Factors That Accelerate the Process
Several factors can help you move toward the shorter end of your timeline range. Clear decision-making authority that prevents approval bottlenecks speeds progress significantly. Dedicated resources who can focus on migration rather than splitting attention across multiple projects maintain momentum. Experienced team members or agency partners who’ve executed similar migrations bring valuable knowledge. Using proven migration tools and plugins rather than building everything custom saves development time. Realistic scope that resists feature creep and stays focused on core requirements prevents timeline expansion.
Factors That Delay the Process
Conversely, certain factors almost inevitably push timelines longer. Scope creep—the gradual addition of new requirements throughout the project—disrupts planning and extends every phase. Resource constraints when team members are pulled away for other priorities slow progress. Poor documentation of the existing system creates discovery work throughout the project. Frequent stakeholder changes or indecisive leadership creates rework. Unexpected technical challenges like legacy code issues or integration complications require problem-solving time.
Building in Buffer Time
Whatever timeline you calculate, add buffer. A good rule of thumb is 20-25% contingency for unforeseen issues. If your detailed project plan suggests 16 weeks, communicate an 18-20 week timeline to stakeholders. This buffer protects against the inevitable surprises—a key team member getting sick, a critical plugin that doesn’t work as documented, or unexpected compatibility issues between systems.
The most successful migrations are those with realistic timelines that account for complexity, provide adequate time for each phase, and include contingency for the unexpected. Rushed migrations almost always create technical debt, user frustration, and post-launch firefighting that would have been avoided with a more measured approach.
Conclusion
CMS migration is not a sprint—it’s a carefully orchestrated journey that demands patience, planning, and realistic expectations. As we’ve explored throughout this guide, the question “how long will this take?” doesn’t have a simple answer. A small business site might transition successfully in two months, while an enterprise platform could require six months or more of dedicated effort.
The key takeaway is that each phase of migration serves a critical purpose. Rushing through planning to start development faster inevitably leads to rework. Cutting corners on testing to meet an arbitrary launch date risks user experience and SEO performance. The organizations that execute the most successful migrations are those that respect the process, allocate adequate time to each phase, and resist the pressure to compress timelines beyond what’s realistic for their specific situation.
The Importance of Building in Buffer Time
One of the most common mistakes in migration planning is creating timelines with zero margin for error. Smart project managers build 20-25% buffer time into their schedules. This contingency doesn’t represent pessimism—it reflects the reality of complex technical projects. The buffer protects your team from burnout, maintains quality standards, and ensures you can address issues thoughtfully rather than rushing to meet artificial deadlines.
Planning Your Migration Journey
As you embark on your own CMS migration, use the phase-by-phase timelines in this guide as a starting point for your planning. Assess your specific situation honestly: How many pages need migration? How complex is your custom functionality? How experienced is your team? Understanding the cost of CMS migration goes beyond just financial investment—it includes time, resources, potential business disruption, and opportunity costs. When you factor in the true cost of internal team hours, potential revenue loss during extended timelines, and the risk of a poorly executed migration, investing adequate time upfront becomes the most economical approach.
Whether you choose to tackle your CMS migration in-house or partner with a CMS migration agency, the most important step is starting with a realistic timeline based on your specific needs and constraints. Remember that the timelines outlined here—totaling anywhere from 8 to 32+ weeks depending on complexity—represent baseline expectations that should be adjusted based on your unique circumstances.
Your new CMS will serve your organization for years to come. Investing the appropriate time to execute the migration properly pays dividends in long-term satisfaction, performance, and capability. The journey from planning to launch may be longer than you initially hoped, but with realistic timelines, thorough execution, and adequate buffer time, you’ll arrive at a destination that truly serves your users and supports your business goals effectively.
The difference between a successful migration and a problematic one often comes down to one factor: giving each phase the time it actually needs rather than the time you wish it would take.